
In today's Blogger tutorial I am going to show you how to add a Flickr Slideshow (Flickr Photostream) to a Blogger blog (Blogspot blog). This Blogger tutorial is suited to beginners and newbies to Blogger and contains step by step instructions to create your Flickr slideshow.
This Blogger slideshow tutorial covers the steps to insert a slideshow widget (slideshow gadget) in the sidebar or footer of Blogger and display a set of images uploaded to Flickr. Note the maximum number of images displayed in the slideshow is 20.
There are several different methods to add a Flickr slideshow to Blogger. Which method you use is largely dependent on your own individual requirements. I cover two different methods in the tutorial.
Method 1 - Add a Flickr Slideshow Gadget to Blogger - Photos in photostream are not organized into sets
Method 2 - Add a Flickr Slideshow Gadget to Blogger to display images that are organized in a set
Method 1 - Add a Flickr Photostream to Slideshow Gadget in Blogger
If you will only ever add one slideshow to Blogger from Flickr and don't want to bother with sets use this method to quickly and easily add your Flickr slideshow to Blogger:
- Go to Flickr and find your Photostream link. On your home page when logged into Flickr you will see Your Photostream at the top left under the Flickr salutation

- Click on the Your Photostream link and copy the photostream id from your browser address bar.
http://www.flickr.com/photos/27647187@N07/
It will look something like this. Copy the identifier eg 27647187@N07 - In Blogger go to Design > Page Elements
- Select Add Gadget from the sidebar or footer depending on where you want to place your Flickr slideshow
- Choose Slideshow from widgets in the Basics list
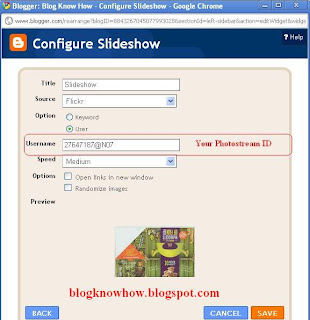
- Choose a title for your slideshow or leave blank

- Under Source use the drop down menu to select Flickr
- Under Option select User
- Under Username enter you Flickr Photostream id eg 27647187@N07.
Note:If you have entered your Flickr Photostream id correctly you will be able to see a preview of your slideshow. - Click on Save and then View Blog to see your new Flickr slideshow in action on your Blogger blog


Method 2 - Add a Flickr Photostream Set to a Slideshow Gadget in Blogger
If you use sets in Flickr to organize your photos and images you will need to use a slightly different method to install a Flickr slideshow into Blogger.
- Log on to Flickr
- Upload your photos and create sets to organize your photos if desired
- Go to view your sets in Flickr and select the set you wish to use for your Blogger slideshow
- In your browser window you will see a URL address similar to the following:
http://www.flickr.com/photos/27647187@N07/sets/72157624508265319/
- There are two important parts to this address that you need to note because we will be using these to create our slideshow:
- Your photostream - designated by something similar to 27647187@N07
- The id of the set - designated by something similar to 72157624508265319

- Your photostream - designated by something similar to 27647187@N07
- In a different browser window log on to Blogger if not already logged in
- Go to Design > Page Elements
- Select Add Gadget from the sidebar or footer depending on where you want to place your Flickr slideshow
- Choose Slideshow from the list of Basics Widgets
- Click on the blue plus sign to the right of the Slideshow gadget to activate and configure your Blogger Flickr Slideshow
- Choose a title for your slideshow or leave blank
- Under Source use the drop down menu to select Other (Note do not select Flickr if you are using a set as this will not work - see Method 1)
- In the Feed URL section enter the following feed:
http://api.flickr.com/services/feeds/photoset.gne?set=72157624508265319&nsid=27647187@N07&lang=en-us&format=rss_200
- Substitute your photostream id (this will unique to your Flickr account)
- Substitute the id of the set of images you wish to display

- Leave the speed of the slideshow at medium unless you specifically need it to be faster or slower
- Click on Save
- Click on the View Blog link to admire your new Flickr slideshow


In today's Blogger tutorial you have learned two different methods to add a Flickr slideshow to Blogger. Both methods use the Blogger Slideshow Gadget but the difference between them is that method 2 shows you how to use a selected part of your Flickr photostream to create a Blogger slideshow for your blog instead of your whole Flickr photostream. Hope you have lots of fun with this Blogger slideshow gadget. Enjoy!
Related Articles
List of Blog Know How Tutorials for Blogger Blogs


0 comments:
Post a Comment